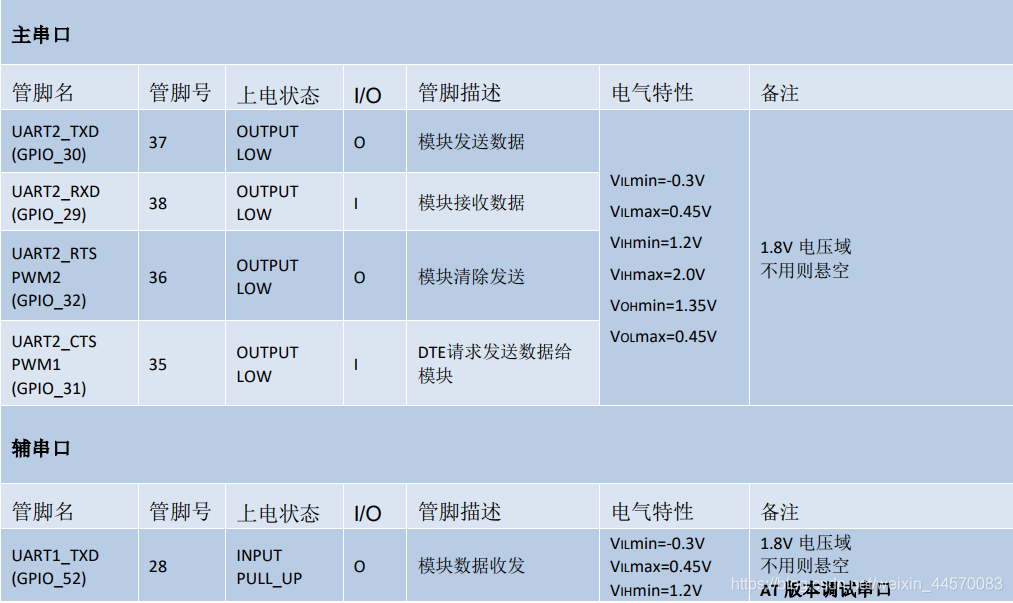
1
2
3
4
5
6
7
8
9
10
11
12
13
14
15
16
17
18
19
20
21
22
23
24
25
26
27
28
29
30
31
32
33
34
35
36
37
38
39
40
41
42
43
44
45
46
47
48
49
50
51
52
53
54
55
56
57
58
59
60
61
62
63
64
65
66
67
68
69
70
71
72
73
74
75
76
77
78
79
80
81
82
83
84
85
86
87
88
89
90
91
92
93
94
95
96
97
98
99
100
101
102
103
104
105
106
107
108
109
110
111
112
113
114
115
116
117
118
119
120
121
122
123
124
125
126
127
128
129
130
131
132
133
134
135
136
137
138
139
| --- 模块功能:更加易用的串口
-- @author CX
-- @module
-- @license MIT
-- @copyright CX
-- @release 2020.02.13
module(..., package.seeall)
require "clib"
------------------------------------------------------------------------------------
-------------------------------函数说明---------------------------------------------
------------------------------------------------------------------------------------
--[[
* @description: Uart初始化
* @param
----------uart_id {numble} 串口号,可选0,1,2
----------baud_rate {numble} 波特率,可选1200,2400,4800,9600,10400,14400,19200,28800,38400,57600,115200,230400,460800,921600
----------data_bits {numble} 数据位,7或8
----------parity {numble} 校验位,可选uart.PAR_EVEN, uart.PAR_ODD或uart.PAR_NONE
----------stop_bits {numble} 停止位,可选uart.STOP_1,uart.STOP_2
----------receive_cb {function} 接收到数据回调函数,回调函数参数uid:接收到数据的串口id
---------------------------------------------------------------------str:接收到的完整数据
---------------------------------------------------------------------len:接收到的数据长度
* @return: 无
function Uart_Init(uart_id, baud_rate, data_bits, parity, stop_bits, receive_cb)
]]
--[[
* @description: 串口发送
* @param
----------uart_id {numble} 串口号,可选0,1,2
----------String {String} 要发送的数据
----------sent_cb {function} 可选,数据发送成功回调函数,回调函数参数uid:发送成功的串口id,
* @return: 无
function Uart_Sent(uart_id, String, sent_cb)
]]
--[[
* @description: 串口关闭,释放占用的资源
* @param
----------uart_id {numble} 串口号,可选0,1,2
* @return: 无
function Uart_Close(uart_id)
]]
------------------------------------------------------------------------------------
------------------------------------------------------------------------------------
------------------------------------------------------------------------------------
------------------------------------------------------------------------------------
-------------------------------下面都不要管了----------------------------------------
------------------------------------------------------------------------------------
------------------------------------------------------------------------------------
------------------------------------------------------------------------------------
------------------------------------------------------------------------------------
local Uart_Receive_Data = {}
local Uart_Receive_cb = {}
local Uart_Sent_cb = {}
local Uart_Sent_Busy = {}
local function Uart_Receive_timeout(uid)
local str = table.concat(Uart_Receive_Data[uid])
if Uart_Receive_cb[uid] then
Uart_Receive_cb[uid](uid, str, #str)
end
end
local function Uart_Re_Notice(uid, ulength)
Uart_Receive_Data[uid] = {}
table.insert(Uart_Receive_Data[uid], uart.read(uid, 1000))
sys.timerStart(Uart_Receive_timeout, 100, uid)
end
local function Uart_Se_Notice(uid, ulength)
Uart_Sent_Busy[uid] = false
if Uart_Sent_cb[uid] then
Uart_Sent_cb[uid](uid)
end
log.info("uart" .. uid .. "send done")
end
--[[
* @description: Uart初始化
* @param
----------uart_id {numble} 串口号,可选0,1,2
----------baud_rate {numble} 波特率,可选1200,2400,4800,9600,10400,14400,19200,28800,38400,57600,115200,230400,460800,921600
----------data_bits {numble} 数据位,7或8
----------parity {numble} 校验位,可选uart.PAR_EVEN, uart.PAR_ODD或uart.PAR_NONE
----------stop_bits {numble} 停止位,可选uart.STOP_1,uart.STOP_2
----------receive_cb {function} 接收到数据回调函数,回调函数参数uid:接收到数据的串口id
---------------------------------------------------------------------str:接收到的完整数据
---------------------------------------------------------------------len:接收到的数据长度
* @return: 无
]]
function Uart_Init(uart_id, baud_rate, data_bits, parity, stop_bits, receive_cb)
if receive_cb == nil then
log.info("CXUART", "Please fill in the receive data callback function!")
return false
end
Uart_Receive_cb[uart_id] = receive_cb
Uart_Sent_Busy[uart_id] = false
pm.wake("mcuart")
uart.setup(uart_id, baud_rate, data_bits, parity, stop_bits, nil, 1)
uart.on(uart_id, "receive", Uart_Re_Notice)
uart.on(uart_id, "sent", Uart_Se_Notice)
end
--[[
* @description: 串口发送
* @param
----------uart_id {numble} 串口号,可选0,1,2
----------String {String} 要发送的数据
----------sent_cb {function} 数据发送成功回调函数,可选
* @return: 无
]]
function Uart_Sent(uart_id, String, sent_cb)
if Uart_Sent_Busy[uart_id] == false then
Uart_Sent_Busy[uart_id] = true
Uart_Sent_cb[uart_id] = sent_cb
uart.write(uart_id, String)
else
log.info("CXUART", "Device is busy, please try again later")
end
end
--[[
* @description: 串口关闭,释放占用的资源
* @param
----------uart_id {numble} 串口号,可选0,1,2
* @return: 无
]]
function Uart_Close(uart_id)
uart.close(uart_id)
Uart_Receive_Data[uart_id] = nil
Uart_Receive_cb[uart_id] = nil
Uart_Sent_Busy[uart_id] = nil
Uart_Sent_cb[uart_id] = nil
end
|